Mink Knitted Helmet Hat & Passenger Cowl

I’m finally ready to share two of my latest knitting projects, a knitted “Helmet Hat” from a Vogue Knitting pattern and a knitted “Backseat Passenger Cowl” from a free Amy Castillo pattern on Ravelry.
Mink Knitted Helmet Hat & Passenger Cowl

Helmet Hat

I used size 8 circular knitting needles and 1 skein of Lion Brand Wool-Ease in Mink Brown.

I followed the pattern as written, but modified the side pieces slightly. As the pattern was written, I thought they would be too tall and floppy.
Mink Knitted Helmet Hat
Here’s what I did:

After the textured rib pattern repeat, work row 1 again.

Next row: K1, p2 *ssk, p2* repeat from * to *, end with k1. 25 stitches total.

Next row: P1, k2tog, *p1, k2tog* repeat from * to *, end with p1. 17 stitches total. Bind off.
Mink Helmet Hat Detail

Passenger Cowl

I used size 8 circular needles and 2 skeins of Lion Bran Wool-Ease in Mink Brown.

I followed the pattern as written except for 2 minor things: I casted on 144 stitches instead of 157 and I added 1 additional knit & purl round repeat.

Mink Passenger Cowl Detail Side 1
Mink Passenger Cowl Detail Side 2


I love how this pattern is reversible! Each side has a different look due to the number of purl stitches. One is a bit chunkier.


Visit my Ravelry projects page to see these and more of my projects!

Fun Find Friday: Antique (free) Craft Pattern Library

This week I stumbled on an awesome website through another craft pattern blog post. It has HUNDREDS of old craft patterns for knitting, crocheting, tatting, quilting, cross stitch, embroidery, and the list goes on……

It’s the Antique Pattern Library compiled by New Media Arts, Inc.

The booklets on this website contain antique patterns, some published as early as the 1800s, with links to download the complete booklet in .pdf form (for free)! I have loved looking through some of these pattern books. I think it’s fascinating to see the old styles and fashions, as well as the cover artwork.

How awesome is this Irish crochet coat from this booklet? Can you imagine wearing it as “everyday” clothing?Fun Find Friday Antique Patterns

I hope you enjoy this trove of patterns – they will certainly keep you busy!

Lacy Table Runner from Scarf Pattern

I had big plans to crochet a lacy scarf I found on Ravelry.

Img57909224_medium

As it grew, I decided it would be better if it were a table runner.

Touring Table Runner

It was a little too wide to be a scarf, partly due to the yarn I chose. So, what began as a frilly scarf became a perfectly sized ivory table runner.

Touring Table Runner 2

I used the Tours Scarf pattern on Ravelry, with a few alterations:

  • Size B crochet hook
  • Artiste #8 Crochet Cotton, in Ivory, 5 balls
  • For the foundation chain, chain 79 instead of 112. The pattern will repeat as written over those stitches. Repeat the pattern until piece measures close to 51 inches in length, not stretched.
  • On the last round of the edging, I didn’t follow the pattern as written. Instead, I worked a sc in each of the dc’s and the sc’s of the previous row. And, I chained above all of the chains of the previous row. So, the last row of the runner went something like this: *sc, ch, sc, ch* repeat.

Touring Table Runner Edge

Finished size: 12″ x 52″
Touring Table Runner Detail
Edging detail.

Have you ever changed your plans for a project part of the way through?

Finished Hat from Solar-Dyed Yarn Project

Hi everyone! I wanted to share these photos of my finished project. After completing my solar dyed yarn project, I searched Ravelry for an interesting pattern to use my new yarn. I chose the free knitted hat pattern ‘Felicity‘ . I did make a few changes – I completed fewer increases and made the hat slightly shorter overall. I’m happy with the results. What do you think?

Kool-Aid Dyed Yarn and Knitted Hat

The Hat - Kool-Aid Dyed Yarn Project Finished!

How-To: Solar Dyed Yarn Project (With Kool-Aid!)

Dyed Yarn Project

Today I’d like to share with you my recent experiences with a solar dyed yarn project — with Kool Aid!

I’m always searching for affordable, interesting yarns for my crocheting and knitting projects. With that in mind, I’m usually picky about color combinations or variegated yarn in general. I discovered this blog post about a method of dyeing variegated wool yarn with Kool-Aid, and my quest to choose the perfect colors began.

I was surprised at how simple the process seemed –and it really was easy to do!

After a little more research and a trip to Hobby Lobby, I was ready to begin my project.

Materials:

1 skein animal fiber yarn (such as wool, mohair, or alpaca) I used Hobby Lobby’s I Love This Wool! in Ivory, 220 yards.

Kool-Aid (or other powdered drink mix) I used 5 packets. 3 would work for a lighter result.

Ice Tray(s)

Glass baking dish. I used a 9×13.

About 2 TBS white vinegar

Plastic Wrap

A sunny day for solar-powered heat – or an oven.

Kool-Aid Packets

These are the flavors I used. The Strawberry-Kiwi flavor powder is actually a light pink color. For more info on color combinations and results, see the links at the end of this post.

1. Unwind your skein of yarn and re-wind it in a loose hank. Secure it in multiple places with a  loosely-tied piece of acrylic yarn (or some other yarn that won’t be effected in the dyeing process).

2. Mix each packet of Kool-Aid with enough water to fill approximately 4 cubes in an ice-cube tray. Colors can be combined for different results. You might want to wear gloves in this step because the powder can stain your hands. Don’t add sugar to the Kool-Aid mix – just water. Freeze these trays overnight or until frozen solid.

3. Prepare the yarn by soaking it in cold water and vinegar for about 10 minutes, then wring out the excess water. This ensures that the yarn with accept the dye and wick it up thoroughly. Place the yarn in the glass baking dish.
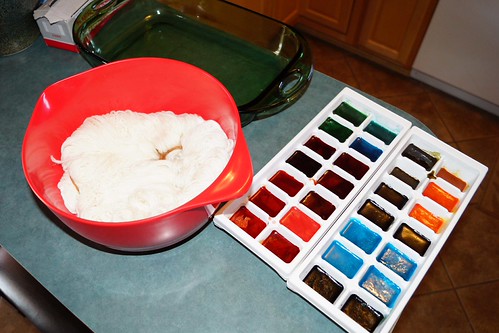
The Setup

4. After the dye-cubes are frozen, place them randomly on the yarn in the baking dish, and cover with plastic wrap.

Ice-Cube Kool-Aid and Wool Yarn

5. Place outside in the sun for 2 hours. Flip the yarn over, and wait 2 more hours. The yarn has to reach a temperature of about 180 Fahrenheit to set the dye. You could also do this process in an oven heated to 180 for a shorter time period.

The following photo is what my yarn looked like after 2 hours. Much of the dye at this point was saturating the yarn in the bottom of the pan.

2 Hours in the Sun

 The following photo is my yarn after flipping. The dye-soaked yarn was then on top, and the colors seeped back down to the less saturated portion of yarn in the dish.

The Flipside - almost finished!

6. Check to make sure the dye is set. The yarn should be very hot, and the remaining water in the dish should be clear – all of the dye should be absorbed by the yarn. At this point, remove the yarn and rinse it in a mild laundry detergent and cold water (it’s very important to use only COLD water here – warm water will start a felting process on this type of yarn). If any dye is rinsing off the yarn, place it back in the dish in the sun for another hour or heat it in the oven for another half hour.

7. Hang the yarn to dry for about 24 hours, rewind into a skein, and make it into something fabulous!

Drying Time

Dyed Yarn Detail

Additional Ideas:

Kool-Aid formulas for dyeing over 100 different colors. http://www.dyeyouryarn.com/kool-aid.html

Kool-Aid Colors. Examples of each flavor and resulting dyed yarn color. http://knitty.com/ISSUEfall02/FEATdyedwool.html

How to dye self-striping yarn using a warp board. http://charisa-martin.livejournal.com/13165.html

How to dye various blue shades using black beans. http://waysofthewhorl.wordpress.com/2011/04/12/natural-dyeing-take-3-black-beans/

December Photo-a-Day Challenge 18. Stocking

December Photo Challenge, Day 18. I crocheted this candy-cane striped stocking a couple years ago.

Handmade Hats and Scarves

Good evening!

I would like to share with you some handmade hats and scarves I have knitted and crocheted.  Most of them in this album are still available for sale, or I can make similar custom items, as well. Prices are listed along with each photo.

Here’s the link to the Facebook album.


Happy Tuesday!

-Courtney

“Howdy” Newborn Cowboy Hat and Boots

I recently had the privilege to make a custom-ordered cowboy hat and boots for a local client. I think they are too adorable, and I wanted to share them with you all. My favorite part of this set is the braided suede hat band – it just makes the hat look so authentic.

I would be happy to make a similar hat and boots for a special boy or girl in your life. Just contact me for more info and pricing. I can make similar items for newborns and toddlers.